

Are you looking for low-cost, DIY décor? Do you live in an apartment with limited space to create crafts? Do you have limited time to sit down to decorate your home? If you said yes to any of those questions, then I have the answer for you!
I recently found a cute pumpkin display that looked fairly easy to make, so I decided to try it myself! You can too! Follow these easy instructions to create your own fall décor!
What You’ll NeedOne decorative fake pumpkin
One half yard of tulle
Two kinds of ribbon
Scissors
One rubber band
A semi-large flat surface
One decorative fake pumpkin
One half yard of tulle
Two kinds of ribbon
Scissors
One rubber band
A semi-large flat surface
*All supplies can be found at a craft store. I found mine at Michael’s & Hobby Lobby.

Time Required
Depending on your bow making skills, plan for about 10-15 minutes for this project.
DirectionsStart with your decorative fake pumpkin.
Lay the tulle flat and set the pumpkin in the middle of the rectangle. Pull the tulle up around the pumpkin and bunch around the stem.
Tie your rubber band around the tulle at the base of the pumpkin stem. You’ll feel like you’re tying a ponytail. Pull the top of the tulle up to fluff.
Cut your first ribbon about two feet long and tie in a bow around the rubber band.
Cut your second ribbon about two feet long and pull it through the first bow between the loops and the strands.
Tie your second ribbon into a bow, so it sits in the middle of the first bow.
Fluff your bows and enjoy!
   
Suggestions & TipsReal pumpkins can rot easily, so I only suggest a fake one. I found out the hard way last year when I stained my carpet pumpkin orange. Oops! Plus you can reuse the decoration next year!
I got my pumpkin on sale at Michael's! Hurry to a craft store before prices go up!
I chose one wide ribbon and one skinny ribbon (with help from my mom!) to create the layering effect. You can change ribbon type, color, or fabric to create any look you like.
Ribbon with wire helps create a more fluffy bow. (The black and white ribbon I used was wired.)
You can also use a short, stalky pumpkin, but be sure to test your tulle size so it fits.
I used a dining room table as my flat surface to work on. You can also use a counter top, coffee table, desk, etc. if you are in a smaller apartment.
For on-the-go directions, save this graphic!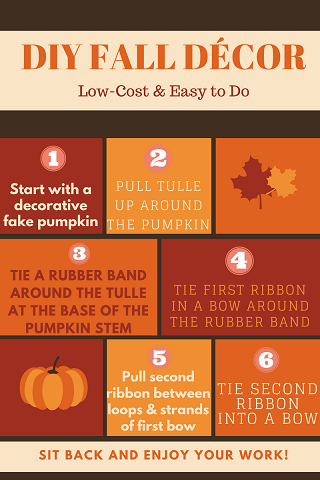
Start with your decorative fake pumpkin.
Lay the tulle flat and set the pumpkin in the middle of the rectangle. Pull the tulle up around the pumpkin and bunch around the stem.
Tie your rubber band around the tulle at the base of the pumpkin stem. You’ll feel like you’re tying a ponytail. Pull the top of the tulle up to fluff.
Cut your first ribbon about two feet long and tie in a bow around the rubber band.
Cut your second ribbon about two feet long and pull it through the first bow between the loops and the strands.
Tie your second ribbon into a bow, so it sits in the middle of the first bow.
Fluff your bows and enjoy!
   
Real pumpkins can rot easily, so I only suggest a fake one. I found out the hard way last year when I stained my carpet pumpkin orange. Oops! Plus you can reuse the decoration next year!
I got my pumpkin on sale at Michael's! Hurry to a craft store before prices go up!
I chose one wide ribbon and one skinny ribbon (with help from my mom!) to create the layering effect. You can change ribbon type, color, or fabric to create any look you like.
Ribbon with wire helps create a more fluffy bow. (The black and white ribbon I used was wired.)
You can also use a short, stalky pumpkin, but be sure to test your tulle size so it fits.
I used a dining room table as my flat surface to work on. You can also use a counter top, coffee table, desk, etc. if you are in a smaller apartment.
For on-the-go directions, save this graphic!

Now that you're a DIY crafting pro, check out more DIY projects to enhance your home. If you're looking for a larger space to perfect your crafting, don't forget that Camden always has apartment home options for what you need! Happy DIY decorating!


Let's be longtime friends—subscribe today!
